
Friday, December 22, 2006

Thursday, December 21, 2006
Saturday, December 16, 2006
The Butters Show! :D

Who's the boy who can laugh at a storm cloud?
Turn a frown into a smile for free?
Who's the kid with the heart full of magic?
Everyone knows it's Butters!
That's me!
Who's the boy with the eyes full of wonder?
Thinks being yourself is the best thing to be?
Who's that rascal with the tweezers in his pocket?
Everyone knows it's Butters!
That's me!
Jumpin' in puddles, skippin' down the hallway
And he goes to petting zoos. He loves John Alway.
[Butters, with pic of himself and John Elway, corrects the choir: "Elway!"]
Who's the tyke with the cutest little dimples,
Battin' his eyes at every puppy he sees?
If you look inside yourself, you might be surprised when you find
A little boy named Butters!
That's me!
Yeah..
Friday, December 15, 2006


Thursday, December 14, 2006
Copying Wong Kar Wai

If I would make my wishes this year, I'd want -
- to be the next Wong Kar Wai
- to capture even half his vision..
- try to mimic his imagery in 3d;
- steal as much pictures over the net and come up with a Wong Kar Wai filter;
- buy me a new Holga camera
 Here's one sample from the Holga gallery.. nice shot. Very Wong Kar Wai-ish..
Monday, December 11, 2006
3D Post No. 9a - Night Scene
Yeah, 9a. The boss liked the overall feel of her new interior :) so I was inspired to experiment the same concept with a night scene. Night scenes are tricky- it is not a case of simply turning on the light sources and turning off that strong sun light parameter.. the overall night environment actually delivers a blue wash for a more dramatic effect. I suppose this is exaggerated only in good camera photographs. There is a more scientific explanation to this though, something about the color spectrum, color wavelengths and whatever.. I read it somewhere, the link now escapes me.. It's very useful because it really helps renderers to play around with different light settings. :)
Here are the results of that night scene setup:


Sunday, December 10, 2006
3D Post No. 10 - Bedroom Blues
I had this bedroom render which was too washed out on dark blue, so I had to make some color corrections in photoshop. The fluffy bed model was provided to me by Jeff (Cray in 3dpinoy.com), another 3d artist par excellence.. Thanks dude!
After resetting the colors using color balance (more reds and yellows on the midtones and shadows), here's the result:
To brighten the scene, I used the curves option.. By adding a point and turning the curve upwards on the right side of the graph, the highlights are increased accordingly.

To further enhance the scene, I duplicated the layer and set the layer blending mode to 30% screen, and applying a 4.0 pixels gaussian blur value. (The original file is 1024x768 pixels.)
Friday, December 08, 2006
3D Post No. 9 - My Boss' House


Views of the dining area, and the patio:


Thursday, November 30, 2006
Yes! That's My New Beetle.. NOT!! (yet hehehe)

I was about to get a heart attack (with joy) when my gmail alerted me of an email and the subject was "Yes! That's My New Beetle!".. and I thought.. oh yeah.. I actually WON???
Turned out to be just a summary of my lucky draw chances.. Dang will someone please be more mindful of their promo names??? :D Blech!
Sunday, November 26, 2006
Movie Review: Happy Feet
 Damn those movie hypes. I watch the trailers at least once a day, download desktop wallpapers and screensavers from the movie's websites, and bore my friends by dishing out trivia about the movie no matter how uninterested or indifferent they are with the films. Then I book the movie seats online, on the first few days of the movie's screening dates. I thought the disappointing "The Da Vinci Code" taught me a lesson already, but "Happy Feet" seems to be too enticing to resist, so I carried on with the hype nonetheless.
Compared to this year's flicks such as "Cars", "Madagascar", or "Ice Age 2", "Happy Feet" stands out. As a comedy, it is at par with "Shrek 2". Five Latino penguins (Robin Williams is one of them!) instead of one Hispanic cat, that'll really make you laugh hard man..:D
The CGI aspect of "Happy Feet" is really AMAZING. Hands down, much better than ILM, WETA Digital, and even Pixar. I suppose Animal Logic has become the new benchmark for CG animated films. Lots of kick-ass lighting and texturing, very dramatic and panoramic environments, superbly animated creatures, (there are moments when it is difficult to juxtapose the CG and the real thing) not to mention the kinetic camera movements.. The minimalist color palette of the film (limited tones of blue white black and occasional reds, yellows) added to its excellent rendering style. Reminiscent of why "The Incredibles" was, to me, more visually appealing than to the horror vacui that is "Toy Story". The CGI alone would definitely be one of the key reasons to best see "Happy Feet" on a widescreen.
The first hour and a half of the movie gave me the impression that this was going to be the greatest animated film I've ever seen.. Cool musical numbers, great choice of songs (check out the "Boogie Wonderland" segment).. When the Latino Adelie Penguins - the Amigos - arrived, the fun really began.. :D The film also effectively established Mumble's (Elijah Wood's) character and his struggle with his uniqueness (he can't sing, but he can tap dance real fierce).
But towards the last few moments of the film, Mumble's personal issues took a backseat in favor of environmental concerns. Ironically, this sort of plot usually leads to a movie classic: a unique individual finding a place in the world realizes his significance, changes the world, makes it a better place, for you and for me and the entire human race heeee heeee sha-mooon.. but no, the film faltered.. It has somehow failed to resolve Mumble's personal conflict, and the environmental resolution was too remote, implausible.. It starts off spectacularly, with lots of music and fun, a good pacing, yet it ends too seriously, a pale musical number, and drastically. I still consider the totality of "Finding Nemo" better. I hope they release an extended DVD of "Happy Feet" where they would revise the last 30 minutes. Probably put more of Robin Williams and the Amigos there. :)
.. or I may REALLY just have been extremely overhyped - my expectations for the film skyrocketed.. it could've probably been a different movie experience..
Friday, November 24, 2006
3D Post No. 8 - Animatics
I've been toying with several options for our new company animation title. When you're too lazy or possess a creative brain about the size of a peanut (like mine) , the best thing to do is get ideas from tv or movies or items that can easily be 3d modeled. Hmm: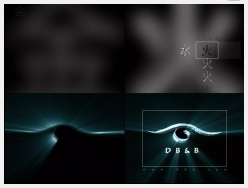 First one. Crap.. Very basic, with all that overused glow effect.
 Concept lifted from mahjong cubes. Ech... Logo didnt look too good from the top view.. But the domino effect is quite ok.
 I was trying to do a TRON effect here.. but the boss didn't like the logo smashing into pieces.. haha.. Too bad cos TRON was like one of the coolest CG movies ever. The other one is Flight of the Navigator. I think I'm digressing.. moving on:
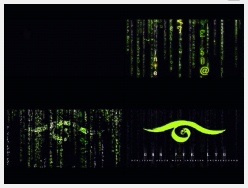 Does this mean my company is a machine world where they control all their workers inside their own matrix..? Who cares.. this I'm sure is the most overused title concept ever! The Wachowski brothers have moved on from their inferior Matrix Revolutions, so shall we..
 Hmm.. a 007 effect..? Casino Royale influences?? Duh.. why not do a concept with dancing penguins as well?
 What the hell..?? Copyright issues man! :D
Ok.. zeroing in on a concept.. (drum roll) Whoa! this is nice.. concept similar to that Nine Inch Nails' "Only" video.. Albeit a poor reproduction.. But the pulsating nails are cool..
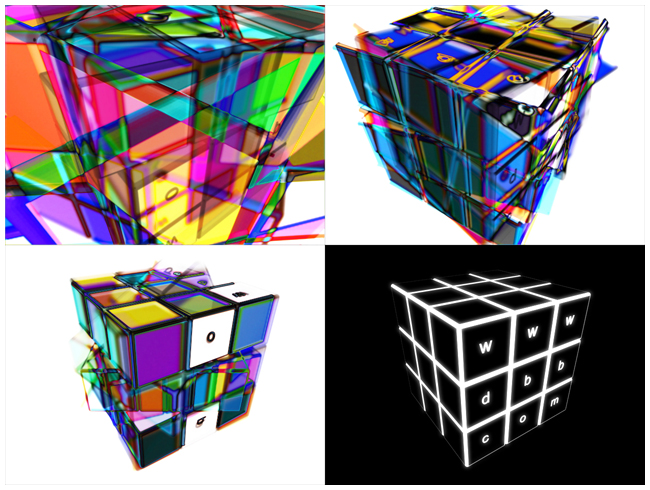 Well, ended up with this concept. And no movie influences I can think of.. :D It's really straightforward, an animated rubiks cube done in 3DS Max, overlaid several times in post processing, time delays with inversed colors. Graphic geeks, you should get the idea. :D Good thing our website url fits perfectly on those 9 faces..!
Tuesday, November 21, 2006

Sunday, November 19, 2006

Spiderman 3 Full Trailer
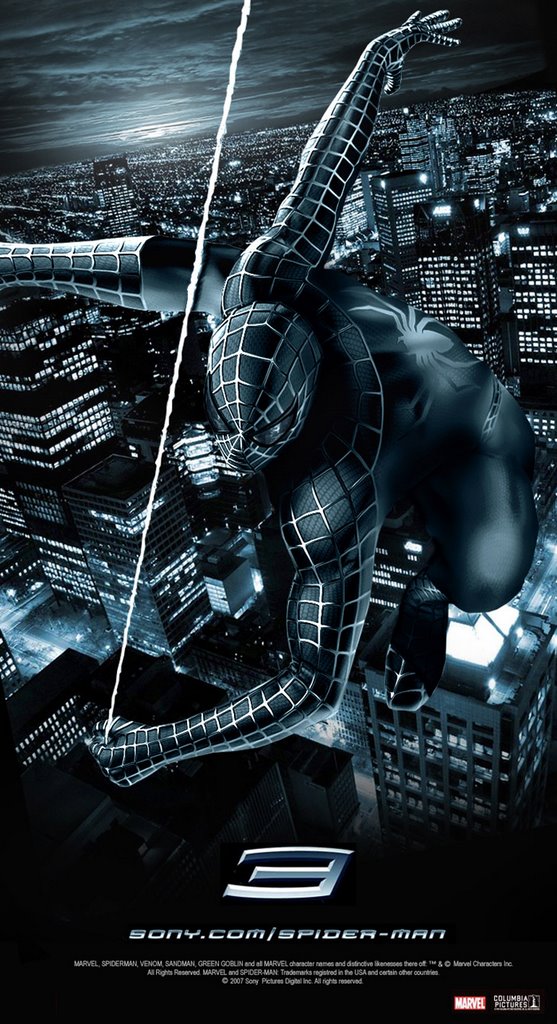
The first full-length trailer of Spiderman 3 has arrived. Yeah! Too bad i missed that IGN tip, youtube has featured a version of the trailer that even showed how Venom would look like in the film.. :D
Friday, November 17, 2006
3D Post No. 7 - Ambient Occlusion
I see really good scanline stuff occasionally - done by either very talented individuals or because they have loads of hours to spend editing. But one setback to using scanline is that it produces poor shadows hence making the objects float.
This technique might help improve a scanline output - a technique called ambient occlusion. Ambient occlusion is simply "a ratio of how much ambient light a surface point would be likely to receive. It simulates a huge dome light surrounding the entire scene etc etc."
Ok experiment, experiment. Got this one click AO generator from Da_Rock.. Thanks again dude.. MKAY!
Here are the 3 steps I used for this example. Pulled out one of my old scanline renders, an old dark room with some ballet images:
Next step: using the plugin, rendered my AO pass..
Finally, compositing in Photoshop with some color correction.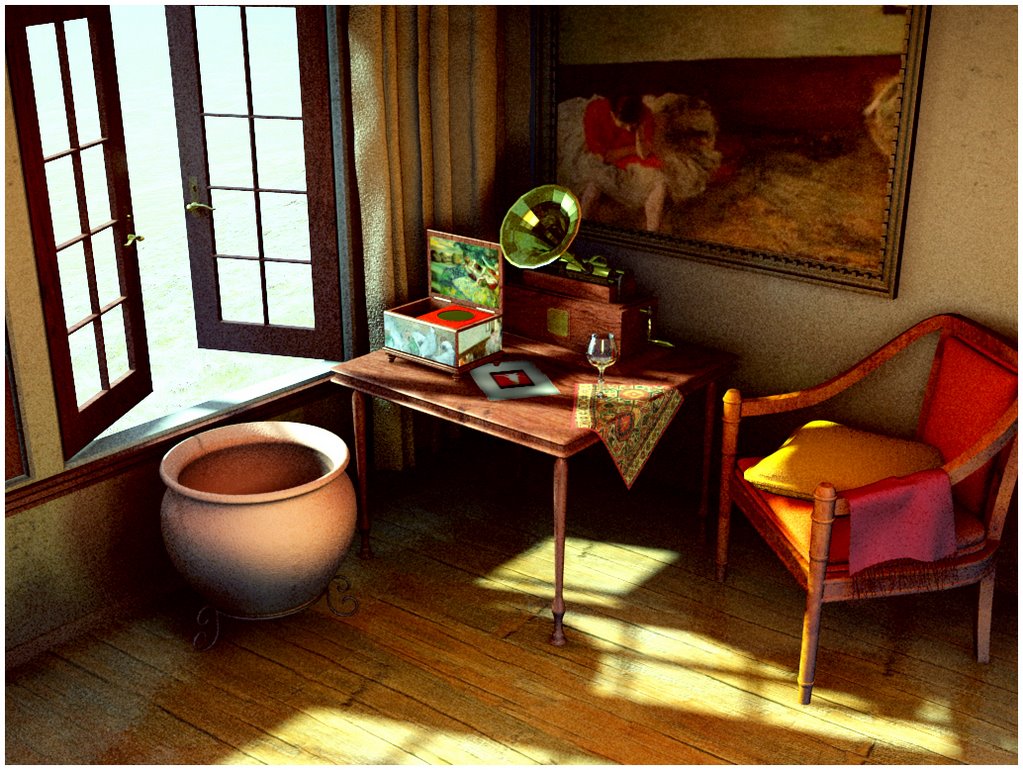
Yeah! Im quite satisfied with the result.. :D

Thursday, November 16, 2006
3D Post No. 6 - Faking Highlights
This time it's all about scanline editing and enhancing. Here's one of our company showroom projects which was rendered, not in vray, but using standard lights. The trouble with standard light setups, as what my previous 3D scanline tutorial illustrates, you may always reach an acceptable output level but it will never look realistic, at least not without spending too much time on preparing the scene. In this example, I skipped the raytrace reflections on the car paint material because they are taking up too much of my render time. Photoshop is an excellent tool in enhancing the areas where I've left off - the highlights of the car finishes. Just set a new layer then spray (brush tool) away.. keeping in mind that those highlights are actual reflections of the light fixtures in the scene..
 left: before PS right: after PS
 Asked Mir to do his color correction magic in PS, here's what he came up with, a sharper more contrasty look. It's probably a plus that Mir does photography since he knows how to balance the dark and light areas well..
3D Post No. 5 - NPR
Kudos to Pineapple Ryan, picked up a lot of techniques from this post of his. (Thanks!) Tried applying the colour channels in this old piece of work, a house designed for one of my company's directors. Having rerendered the model, I realized the reflection on the cyan area below was a previous error that I overlooked. It's just not physically accurate to have a strong reflection there, when everything else in that perimeter area is made of the same glass material.
Anyway, what the heck.. I am not a total advocate of realistic 3D stills. So an occasional error I can tolerate :D.
I really dig those old-school architectural sketches. But I am not thinking of filtering this 3D render in PhotoShop or Piranesi with those water color effects.. I thought ok, I'll just try to "stylize" this render in a different way - experimenting with the traditional GI render plus flat landscape elements.
I'll have to work out on my environment settings though. I feel that I've been doing a lot of "a storm is coming" sort of lighting effects lately.. :D
In the meantime, go check out those 3D websites with .cn - forums in China - never mind that you won't understand their text, these sites are repositories of amazing renders. Buttrock.

Saturday, November 11, 2006


Friday, November 10, 2006
3D Scanline Tutorial
Some 3d friends are bugging me to write a tutorial.. So here go my two cents in the 3D world (concepts not entirely mine, if you really want a better tutorial visit the 3D God Montree on this site. And also his latest work here.)
Anyhow, here's how to mimic a radiosity/GI render using 3dsmax's standard lighting - scanline rendering. I apologize, this tutorial is intended for those who already know the basic concepts of 3D Studio Max.. not entirely for beginners :D.
First, set up the scene using the following parameters. The light positions can be seen on the first image: Click on the image for a larger version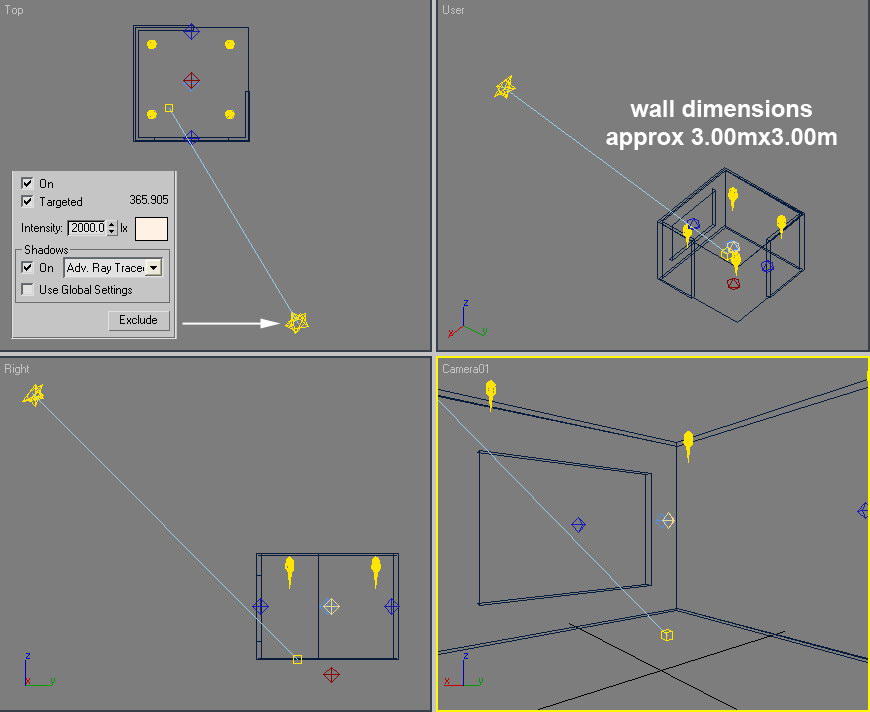
Below is the configuration of the different omni lights. As a rule, there shall be two main omni lights at the center of the room, one that illuminates the entire wall (light blue), ceiling and floor, and another omni (yellow) for casting shadows. There is also an omni light placed by the window to simulate the blue light filtering inside the room, and another omni light on the other side of the room to compensate for the red tint that emanates from that area. This tint can be any color based on the mood intended for the scene.
The red light below the floor is set to -0.2. Negative tints produce an inverse shade on the hue spectrum. Hence, -0.2 light blue in this example will produce a dark red in the scene. Click on the image for a larger version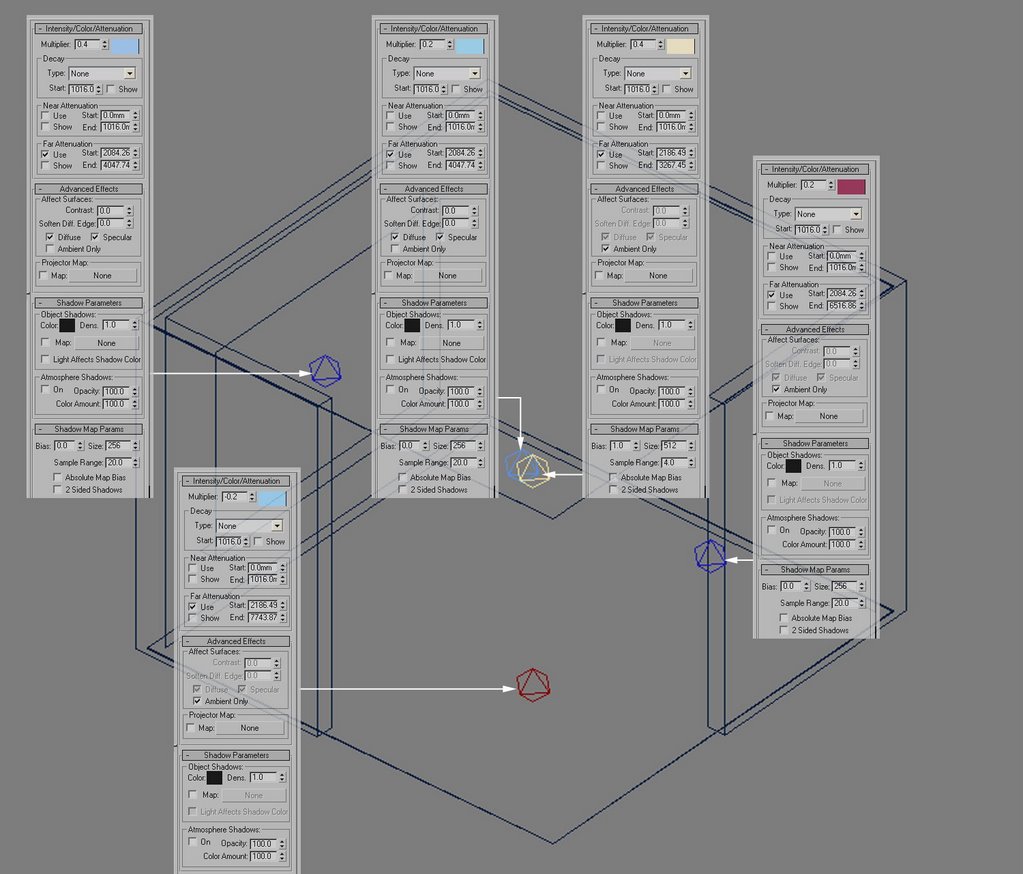
The initial GI is set. Here's a rough preview: Click on the image for a larger version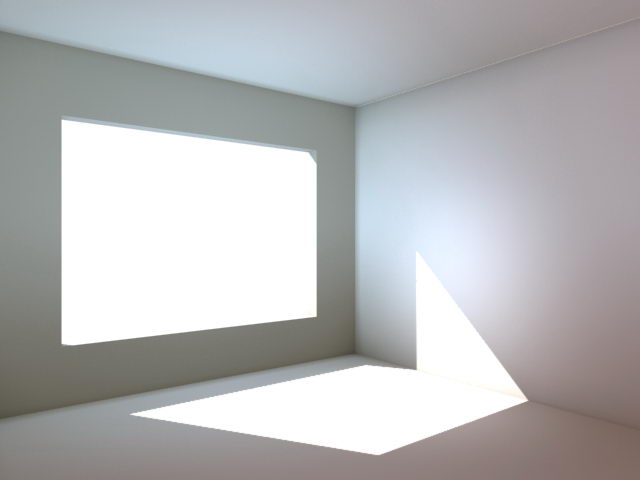
Now you can add the position of the other light emitters. I used cove lights and another set of cooper lights to compensate the light spot on the floor. Click on the images for a larger version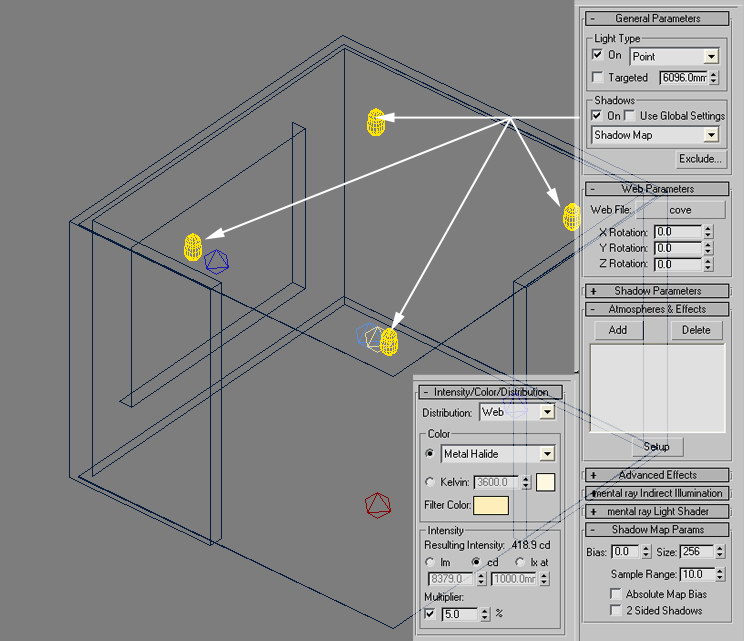
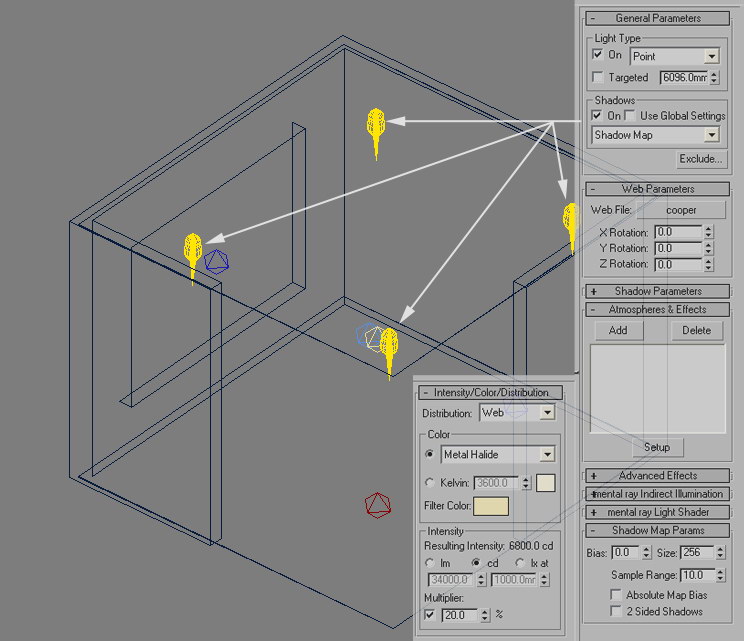
After adding a few more elements, here's a sample test scene (no materials): Click on the image for a larger version
Hope this helps.. I think it's a pretty tedious effort for faking radiosity.. Vray would still be my GI plugin of choice, but for fast renders with a lot of revisions (and even an intended walkthrough), this style of rendering might do the trick. :)